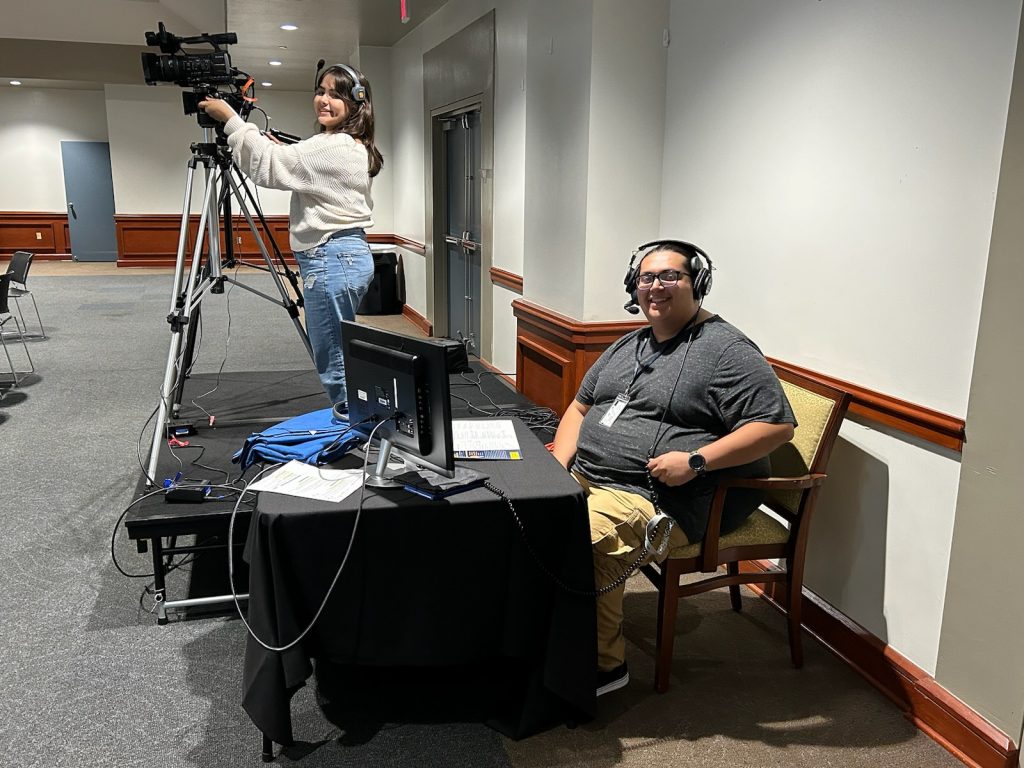


Ever seen someone in the back of an event at St. Mary’s University with this strange looking camera, a cart with a monitor and tripod?
As a student assistant in the Academic Media Center (AMC) at St. Mary’s University responsibilities include videotaping events and presentations for school archives and live streaming. This process of setting up and filming the event is actually a very specific process. From transporting this equipment to being able to configure the camera, mics, and monitor. Understanding the procedures only highlights the importance of the behind the scenes work but also can give a guide. These steps can better help to understand the process that is used by the Academic Media Center to prepare for our on-campus shoots.
Responsibilities
Within operating media equipment doing with theses shoots it as well involves a strong bit of responsibility. Individuals assigned to these tasks are in a high level of trust with handling the equipment and are expected to transport, setting up and operating the camera within having care and precision. Many shoots include the documenting of important meetings, formal presentations and many campus events some that are live streamed or used in video for the universities use. Maintaining the video and audio quality is very essential. The role that is taken to ensure the recording are stable, well framed and well heard. 1
1. Gathering up the equipment
The process starts with gathering the right equipment to the shoot.
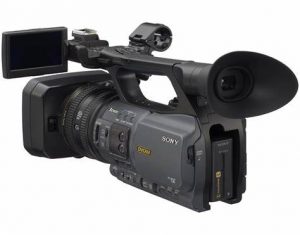
- DV Camera Sony Camcorder
- DV Camera (needed cords)
- Headphones
- Tripod
- Extra Batteries
- Mics 1&2
- Monitor
- Cart
- Extension cord
- Plastic storage box (for loss material
2. Setting up the cart and heading to the shoot location.
- It is recommended that a cart is used to transport the equipment. When setting up the cart, place the equipment so that it’s not going to fall.
- Put the camera on the top as long with the monitor then putting the tripod in the middle section at the bottom section using it for the storage box and put the mics and heads and extension cords or any needed cords in.
- On wet weather days there is the need for a tarp but usually it is not needed.
- If moving equipment to a location that is unfamiliar, it is a good idea to walk the route first without equipment to identify all of the lamps and elevators for best accessibility. Then return with the cart carrying the equipment.
3. Once you get there…
Firstly, beginning to evaluate the space and layout seeing what requirements of the space are needed. Seeing the seating arrangements. where the podium is located or where the stage will be at as well as lighting placements. Since that will have an effect on the shoot the clearness of a shot. 2
On the St. Mary’s University campus many events will happen in the largest conference room in the university center, the Mengler conference room formerly known as conference room A.
Always try to accommodate for the space so try to go to the corners of the room to set up. To keep space for those who are speaking/attending the event so there will be no interference. As well as always making sure to be near an outlet.
The corners are also the best spot for getting the wide and steady shots.
4. The Set up
Once the set-up location is established it’s time to set up.
- Firstly, taking the tripod out and setting it up
- Make sure to be careful with the head of the tripod placing it on your foot flipping the tripod to the feet up and adjusting the length of it.
(most time adjust it to the full length)
- Make sure that the legs are secured before adding the camera.
5. Camera setup
Firstly, taking the camera out of the case.
- Then being able to carry it in a safe manner within the nook of the arm
- Being very careful with the camera making sure to hold it in a manner of holding it correctly and being very aware.
- On the top of the tripod there is a part where it can come off to connect to the bottom of the camera. This is called the head of the tripod.
- Within this process screw the bottom of this to the camera. This can be a tough process but make sure it’s secure and will not nudge.
- Once connected, connect this to the tripod where it needs to be set in place then locked in place once putting it in.
- Now that the camera is connected you can adjust to the controls of the remote arm on the camera. Pull in the remote into the circle port above.
- Then in the camera case should have a battery and power cord.
- While these wires can be connected to the headphones within a port cover with a pink dot on it to hang the headphones on the tripod.
- Connect the battery into the port in the middle of the camera and wait for the click.
- Then next there is a little red dot on a plastic covering a port where the power cord will connect then to the outlet nearby.
- Now open the side screen and make sure there’s a SD in the SD card port if not insert in the first port.
- If a longer shoot use two SD cards for more space.
- The camera should now be on.
6. Mic setup
- So, there are two mics needed to set up in one bag. Some shoots require two mic bags but for a standard shoot it’s usually one mic bag with two mics.
- A receiver and the actual mic.
- First screw the cord to connect the receiver to the camera to it and then the longer wired cord to the mic.
- Then testing the audio. Put the headphones on and test the mic for the audio. If we’ll follow up within the next steps if not fix the tightness of the screw.
- In different situations of mic issues, it can be the issues of switching channels on the mic.
- The receiver connects to the top of the camera or a sleeve of the camera handle where the receiver can slide into
- The mic itself will be connected to an area where a speaker is speaking or on a podium.
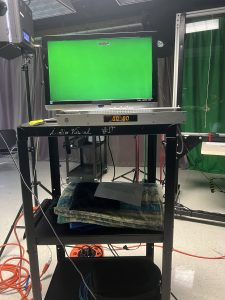
7. Monitor setup
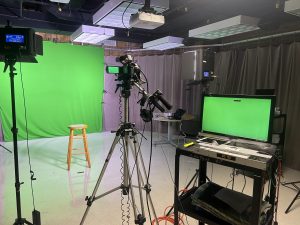
- Since the monitor is on the top of the cart, we can use the top of the cart to prop up the monitor.
- In some cases, it could be on a table seen in the featured photo that is if the table is proved.
- Though most times seen in the photo next to the text that we can use the cart.
- Then connecting the power cord to the outlet to power on the computer.
- Then connecting the HDMI to the computer and the camera.
- Make sure it is in HDMI port 2 which should be labeled as such.
- The screen on the monitor should mirror what is being shown on the camera.
8. Camera Angles and Tips.
- The set up is completed!!
- Now getting a trick of the angles for when the shoot starts
- Avoid getting light (ceiling lights, lamps, bright lights) in the shot to better focus on the presenter (this can affect the lens view on the shot getting glares)
- Avoid getting the ceiling in the shot
- Using the Rule of 3rds
- Focusing on a center or within the side views next to the center
- See when a presenter is showing a PowerPoint to see if getting access to them to get a clearer view of said PowerPoint.
- When angling the camera, it’s good to have it the direction of the podium or wherever the speaker is at.
- If the speaker is walking or changing directions follow them within moving the camera with the arm.
9. Now we have officially set up for a shoot and are ready to start rolling.
Throughout this process the set up can start to follow naturally the more it’s done. Seeing a process that may not be noticed so much to some but can really be a tedious process to me and other workers at the AMC. Learning this process to us has become a practice that has become natural to us within the shooting we take on. Each of these steps play a critical role into what is the final product of having a ready camera for a shoot. By being able to outline these steps it can provide a clearer understanding to those who are unfamiliar to theses setup that are required for video productions. 3 This can help to guide serving as a useful reference to maintaining consistency in covering events to help support the training for the future of student workers in the Academic Media Center.
- St. Mary’s University. (2025). Concept3d.com. https://map.concept3d.com/?id=574 ↵
- Academic Resources | St. Mary’s University | San Antonio, Texas. (2025, March 5). St. Mary’s University. https://www.stmarytx.edu/academics/resources/ ↵
- Livestream | St. Mary’s University | San Antonio, Texas. (2025, February 12). St. Mary’s University. https://www.stmarytx.edu/about/signature-events/live/ ↵


5 comments
rmanzur
This was a really engaging and detailed walkthrough of the AMC video setup process at St. Mary’s. I had no idea how much went into preparing for a campus shoot! The step by step breakdown made it super easy to follow, and I gained a whole new respect for the behind-the-scenes work that keeps events running smoothly. Great job explaining everything clearly!
Andrew Garza
This was a great read. Thanks for shedding light on all the work that goes into something people often think is trivial. There’s way more to it than just pointing a camera; every part, from setup to filming to cleanup, takes planning and effort. I appreciate how you captured that it’s not as easy as it looks.
Micaella Sanchez
I had no idea so much went into it. And I didn’t know that you also participated in school events. I have always wondered about how they got the media from it and what went into it, because I know that you have to record and edit. This type of work I definitely feel like gets overlooked and unrecognized because it does get st Marys out there.
Carlos Flores
Wow, this was such a cool and detailed behind-the-scenes look into what goes into setting up a professional shoot at St. Mary’s. You did a fantastic job explaining each step in a way that’s both easy to follow and really engaging. One fascinating thing you brought up that really stuck with me was the idea of walking the route first without equipment—it’s such a simple but brilliant tip that shows just how much preparation and thought goes into a successful shoot. It’s something most people would never even think about, but it clearly makes a huge difference. Great work breaking everything down so thoroughly and making it clear how important and skilled the work of the AMC team truly is.
Meadow Ayala
I loved reading this because it really shines a light on the hard work that goes on behind the scenes — work that often gets overlooked. It’s clear how much care, responsibility, and attention to detail it takes to set everything up and capture an event properly. The step-by-step breakdown made me appreciate how much effort goes into making things look effortless. You can tell how much pride and skill the AMC team puts into every shoot. It’s not just about hitting “record” — it’s about making sure everything is captured with precision, and that really shows.